This weekend I entered my posament work in the single entry competition at An Tir Kingdom Arts and Sciences and Bardic Championships. I had wonderful feedback and want to share my research and work here as well.


10th Century Birka Posament Based on Finds at Birka
HL Disa i Birkilundi
Andrea Harding
I have been admiring posament for many years. It is complex, beautiful and an interesting way to embellish your garments or other items. This is a technique that is found primarily in Birka Sweden during the 9th and 10th century. However, even in Birka posament is not incredibly common.
Posament is wire formed into pieces that are used to adorn various items. Extent pieces of posament are made of gold and silver. The gold is generally a straight wire but is occasionally found as spiral thread (wire wrapped around a fiber core) as well as twisted pieces. The silver is almost always in spiral thread form. I have focused primarily on the spiral thread or “tentrad” form of posament but did also experiment with the straight wire and formed wire types as well
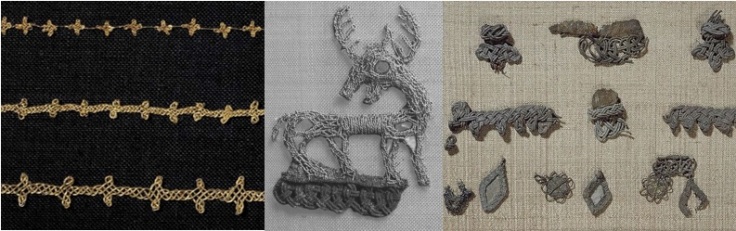
Straight Wire Posament (left), Twisted Wire Posament (center), and Tentrad Posament (right)
Materials
For my posament in the straight wire style I used 24 and 26 gauge silver and gold craft wire.
When working with the spiral thread I used several different materials. Initially I found an item called tentrad. This is a silver colored wire wrapped around a fiber core. I felt this would best represent the original pieces. I decided to make my own tentrad as well. The original posament is made with silver wire wrapped around a silk cord. I used 28 and 30 gauge silver plated craft wire as well as 28 gauge dead soft silver wire. For the core I used hemp, cotton and silk threads.
There are no tools that have been found that are exclusively associated with the creation of tentrad or posament. Most of the things needed would have been easily repurposed for other work such as needles and pins. I used both a 1mm and a .7mm knitting needle with a coiling gizmo to create my tentrad. The only thing that I used in making the posament itself were pins and a foam block to hold the pieces in place.
For the twisted wire project, I used a 28 gauge craft wire as purchasing the gold wire needed for this project would have been far too expensive. I did, however, purchase a foot of 28 gauge solid gold wire to experiment with so that I could get a sense of how working in gold would vary from the copper plated craft wire I was primarily using.
I backed the piece with silk as it was a material that was available to the people of Birka and I liked the idea of using the silk as the core of the coiled posament is silk as well. As with the tentrad, I also used straight pins, wire cutters and a block to pin to.
Research
My first goal was to get a better idea of what posament was used for and how it was created. I contacted Lotta Fernstål of the Historiska Museet in Stockholm, Sweden. I had spoken to her previously about a piece of wire weaving that is on display at the museum and she had been wonderfully helpful. Her colleague Anna Arnberg contacted me and said that Lotta was not available but she would be happy to help. Anna spoke to the textiles curator to get further information on the pieces. She was told that the pieces were most likely attached to some kind of clothing but that unfortunately none of the textile was found so they can’t be certain. She also said that posament has been found on things like scabbards and purses. From my own research I knew that the pieces are generally found in the waist and head areas. Posament being present in the head area indicates that it was also most likely used in hats and headpieces as well. Anna also provided me with a link to their online database showing all of the graves that have been excavated in Birka.
Having access to the museum’s amazing online database gave me an opportunity to see where each piece of posament came from. I wanted to get a better sense of just how rare posament was and if there was any sort of pattern in where it had been found. I was hoping to determine if it was something that everyone had access to or if it was reserved for those of higher status. The database is broken down into several sites on Birka. It gives you access to 1,103 graves that have been excavated and lists the inventory of each one including any photos of the pieces if available. I went through each grave individually so that I could note which graves had posament present as well as the type of grave it was found in.
There are four different categories of graves found on Birka. Chamber Graves are the largest and are primarily from the 10th century, they generally have more grave items found within them. Coffin and Non Coffin graves are from both the 9th and 10th centuries. The Coffin Graves are more modest than the Chamber Graves but many items are still found and the Non Coffin Graves are found with the least amount of items. Cremation Graves are also from both the 9th and 10th centuries and the items found can vary widely with many having no items found.
I found 44 graves containing posament out of 1,103 that I reviewed which means that only 3.99% contained posament. They were found in each grave type however 55% were found in Chamber Graves even though they were only 10% of this type of grave found on Birka. With such a large majority of the pieces being found in Chamber Graves it would make sense that this was something more common in the 10th century as that is the period of time they were utilized. According to research on the Chamber Graves significance in Birka they were not necessarily reserved for the wealthy but it is believed they were intended for those of high status in the community. This means that though posament could be found in small amounts throughout the community it was more likely to be found with those of higher status.


While looking through the photo-graphical inventory of the graves I realized that there are very few pictures of posament showing its size. I found a few with units of measurement on the side and blew them up to actual size. What I discovered surprised me. The pieces were actually larger than I had initially assumed. The tentrad itself looked to be just under a millimeter and the pieces were up to two and a half centimeters tall. I had always pictured these pieces being much smaller than this and the recreations that I have found online were made with the factory-made tentrad that is available in Sweden which does not come in that large of a diameter. I contacted Lotta Fernstål once again to inquire about the size of the tentrad itself as well as the size of the pieces. She was able to get me in contact with textiles curator Amica Sundström. Amica was able to send me a picture showing the size of one of the pieces. Unfortunately it’s a bit blurry and the ruler isn’t directly up against the piece making it difficult to determine the size. The photograph is of a much smaller piece than the ones that I had been looking at previously and I find the variety in sizes that were found very interesting.
Museum pictures showing size of posament
After my initial research into straight and spiral posament I decided to also look into the twisted wire form. This third type is not very common even for posament standards. This is twisted gold wire used to create free form shapes. I was unable to find any pieces with measurement of this type. Much like the other two types, the best information is simply the pictures that we have available to us. Unfortunately, there are a limited number of those as well because it is not generally on display for the general public.
For this part of the project I decided to focus on the third type of posament and more specifically on the formed posament piece found in grave BJ 832 in Birka. I have seen the same black and white picture of this many places and always assumed it was silver. As I looked further into it I was fortunate enough to meet Linda Wåhlander through Facebook who works at Historiska Museet. She had taken a couple of color photos of the piece. This was very exciting because there are rarely new pictures of posament!

New color photographs of “Golden Deer” posament
As is generally an issue with posament there is no size reference for this piece. When speaking to Linda she told me that the piece was roughly 4 cm in size. This is the information that I based the size of my piece on.
Process for the Straight and Spiral Wire Posament
Posament can be broken down into a few different styles of knots. I will use the labels listed in Birka III for each of them (A,B,C,D,E,F,G and H.) These eight types are used in different configurations in most posament. Primarily the pieces worked in tentrad use type E-H.
There are so many different variations of posament that I couldn’t choose one style to try. I decided the best way to get a good feel of the process would be to work in both the solid wire and tin thread while trying several techniques. My final pieces included E, G, F, H, B as well as combinations of B/F, E/G and H/F. I also tried both small and large square pieces.
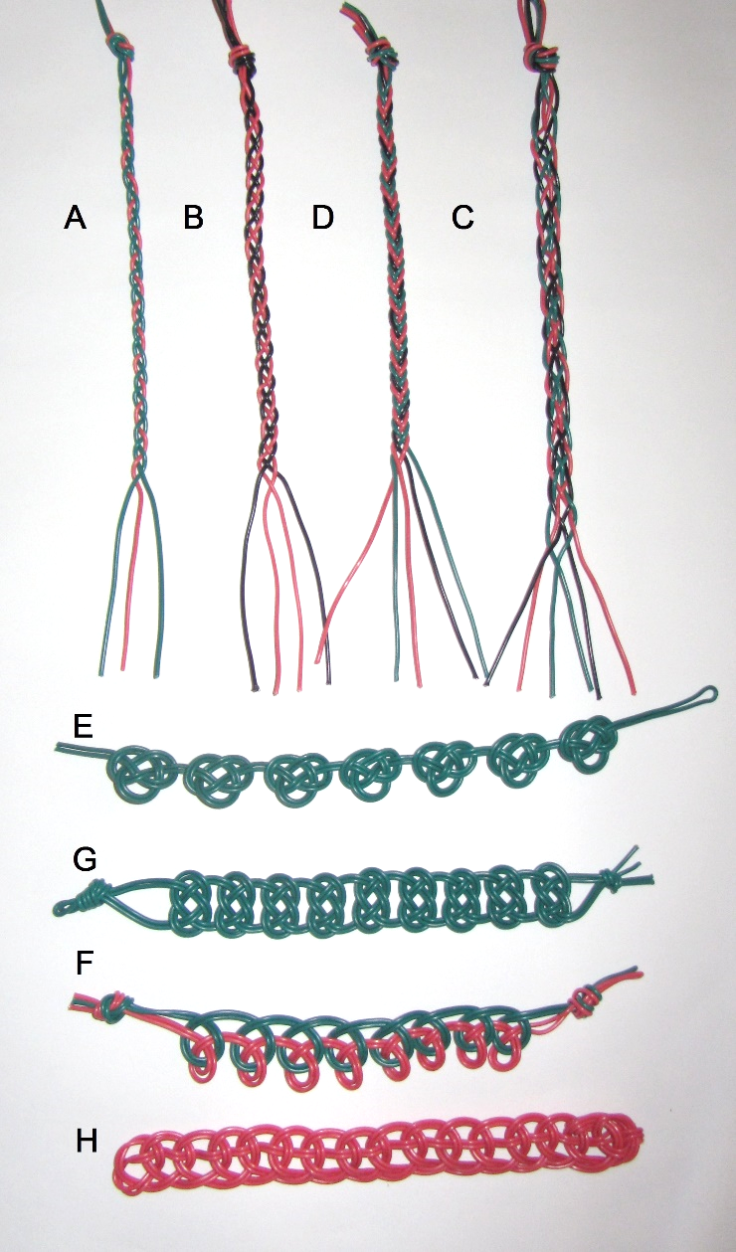
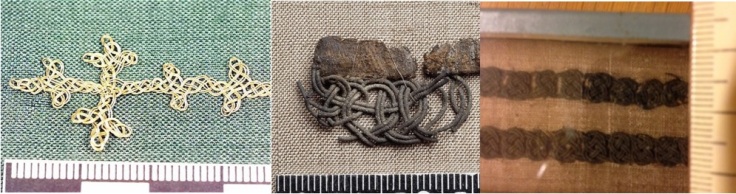
Knot styles found at Birka
I first worked with parachute chord so that I could get accustomed to the knots that I would be using. This made it easier to see how I would need to manipulate the wire and the appropriate areas to tighten. After working with the parachute cord I then moved to hemp as it is smaller but still easier to manipulate.
I began working with 24 gauge silver wire and decided to go with knot G as that was the style I had begun working with. The pieces in wire that I have seen tend to have a more open look to them so I did not tighten them down completely. I also worked with a double wire because most of the examples show two wires being woven together as opposed to just one. This process was not as difficult as I had anticipated as long as you were careful with how hard you pulled the wire. I have done a lot of wire weaving so I am comfortable working with wire already. I believe this made it a bit easier.
Working in parachute cord and straight wire
Braid style posament has been found in both flat and spiral wire. These can be between three and six strands wide. I decided on a four strand braid or type B made from the straight wire. This was the only piece that I kept pinned onto the foam block throughout the process because it was more difficult to keep together and uniform otherwise.
The most challenging piece was the braid and loop design made with a combination of type B and F. As I had no knowledge on how to construct the piece I simply looked at the original and used it as my diagram. This proved to be challenging but I am happy with the results.
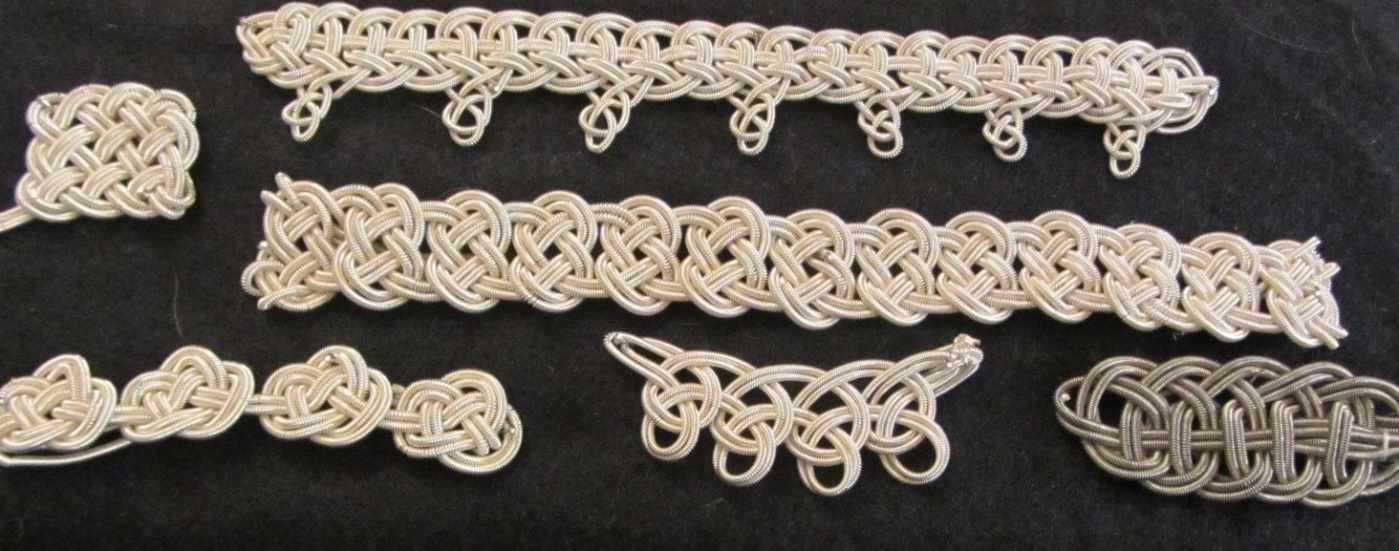
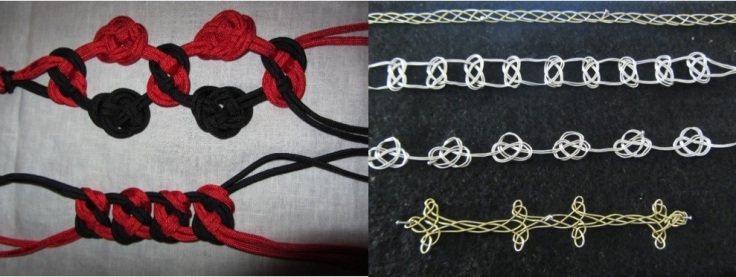
After my practice work with parachute cord, hemp and straight wire work, I decided to try the machine made tentrad. This material can be found in Sweden as the Saami in Lapland still do a similar craft to those found in Birka. I am very curious as to the connection between the people in Birka and Lapland and tried to look further into the history of the Saami’s work with wire but was unable to find any information. I plan to research this further in the future.

A Saami style bracelet (left) and posament created using machine made tentrad (right)
I used the tentrad to recreate the piece that I had contacted the museum about. It is a beautiful piece combining E and G using a double cord. Working with the tentrad was much easier than the straight wire. It is more similar to working with a fiber than working with a wire. I was able to work this piece without out using the block or pins and actually had enough left over to make a small single cord piece of type G.
During this work I was happy with my results but I wanted to investigate further. The machine made tentrad was the closest thing that I could find already made but I wanted to try to make tentrad myself using the materials found at Birka. I started by making a piece entirely by hand. I wound 26 gauge craft wire around a piece of hemp cord to get the idea of what this would entail. I was able to make about a foot of cord which was enough to make a small piece of type E single cord posament. The tentrad was a bit uneven looking and difficult to manipulate. I also ended up with a rather large blister on my finger and decided there must be a better way to do this.
I did a lot of research online on how tentrad could be made. There are machines that spin a fiber and run the wire down it creating guitar cords. This was a possibility but since there have not been any real posament tools found I felt this was not the right way to go. I started looking at making micro coils and realized that a Coiling Gizmo might be a good place to start. I purchased a Professional style coiling gizmo because it came with a pin vise that I could use to work on any sort of rod. It also came with a 1mm rod that I could start experimenting with.
The first process that I tried with the Coiling Gizmo was coiling wire directly on the cord itself. This didn’t work very well as the cord was constantly getting twisted and the unevenness was showing up on the outside of the tentrad. I was having to stop working every few minutes to untwist my cord.
I tried 28 and 30 gauge silver plated wire and settled on the 28 because it has a little more strength and is less fiddly. The 28 gauge also looks like a more accurate ratio between the size of the thread and the size of the coiled wire.
During this process I used three different types of cores; cotton, hemp and silk. I can understand why silk was used as opposed to any other fiber. The silk moves so smoothly that it makes the creation as well as the knotting processes much easier.
I began working with the 1mm rod to see if it might work. The rod was only about 16 inches long which was not long enough to create anything very useful so I decided to make the coil by starting on the end of the rod and working my way toward the pin vise. In this way I could simply push the coil of the end of the rod and continue working. This process created a much more uniform look that was much more accurate to the extant pieces. I was able to make several 3 foot pieces of tentrad and used them to create B and G type knots. Though I was able to get longer pieces there was an issue. Even if I worked the wire in the opposite way suggested by the tool I could still only create a piece of tentrad a few feet long. The issue was that in order to add the fiber core I had to thread a piece of wire all the way through the coil in order to bring the fiber back through. This only works up to a certain length as eventually your wire will get stuck in the center of the coil. The only way to solve this issue was to make the coil on a rod and it then be pushed off directly onto a cord.
As I could not find a way to drill a hole in a 1mm or smaller rod and long needles that I tried ended up sticking I decided to try a circular knitting needle. They have a plastic piece attached to the end therefore there was no bump for the coil to get stuck on like the eye of a needle. I found 1mm and .7 mm metal circular knitting needles and decided to give them both a try. I cut the plastic cord in half and then poked a small hole in it near the end to run my fiber through. The process worked very well! I was able to make a 145 inch piece of tentrad out of 28 gauge craft wire on the first try. It takes 1440 inches of 28 gauge wire to make 115 inches of 1mm or 144 inches of .7mm tentrad. This is 12.5 inches of wire per inch of tentrad for the 1mm and 10 inches of wire per 1 inch of .7mm tentrad. Each piece of over 100 inches in length takes at least six hours to complete.
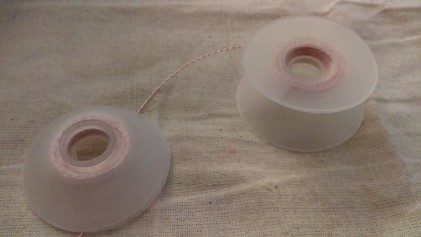
My current process is to take a small strong beading thread and run it through the hole in the plastic, I then coil my wire onto the rod, pushing it off onto the cord as I go. When the piece is complete I remove it from the rod and attach my silk thread to the end of the beading thread. The coil is then slid onto the silk and the tentrad is complete. Each piece of tentrad takes roughly six hours to complete.
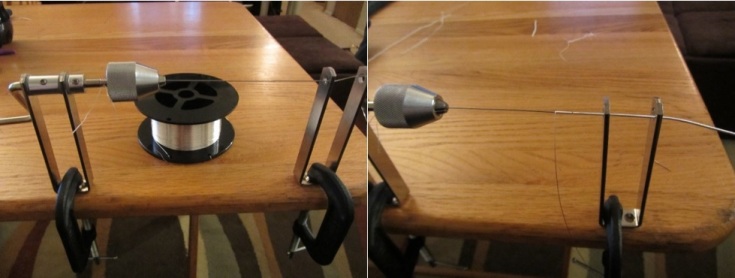
Setup to make tentrad
I created several pieces of tentrad with this method using 28 gauge craft wire and silk thread. When I was confident enough in my method I used the dead soft silver wire and was able to finally create my silver thread with a silk core.

Posament made with 28 gauge silver plated craft wire and silk thread
I used my silver thread to reproduce my favorite piece of posament that has been found. It is a combination of H and F style knots. I have only found one picture of the original piece. The photo is in Birka III and lists it as coming from 1125.
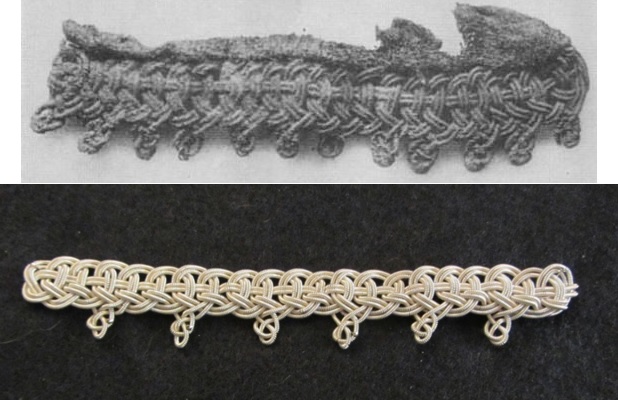
Extent piece from grave 1125 (top) Posament made with silver tentrad and silk thread (bottom)
Process to create the Twisted Wire Posament
Looking at the pictures I could tell that the wire was twisted before it was shaped. I could tell this because the twist is very consistent throughout the piece. If it would have been twisted as it was formed there would have been more inconsistencies. I also decided to use one long piece of wire as there is no evidence of multiple pieces being used. I took my wire and attached the ends to a stationary object (a chair), I twisted the wire at the other end until it was consistent down the entire length. I had a few issues with twisting. Until the wire is twisted to a certain point it can kink fairly easily and I needed to be sure to stay consistent with my tension. I also had one of the wires break on my first attempt because I had one side tensioned tighter than the other.
Twisted wire ready to be formed
I decided the best way to construct the deer was to use a block with a pattern and form the wire there. I started by drawing out my deer, basing it on the extant design, and pinning it to the block. Once I had the basic shape pinned I began forming the wire. I went pin by pin, making sure to keep the wire secured as I created the outline.

(left) Design pinned and ready to be formed (right) Outline of deer complete
The process of filling the inside took quite a bit of time. I wanted to be sure that it was evenly filled while leaving the decorative spaces on the body empty as well a the eye. I shaped the inner wire pinning to keep it in place and form the desired shape. this took a good amount of time as going back and forth with the wire while trying not to get caught up on the pins can be quite finicky. When complete I had used roughly 175 pins to create my desired shape. Then came the scary part, unpinning the deer.
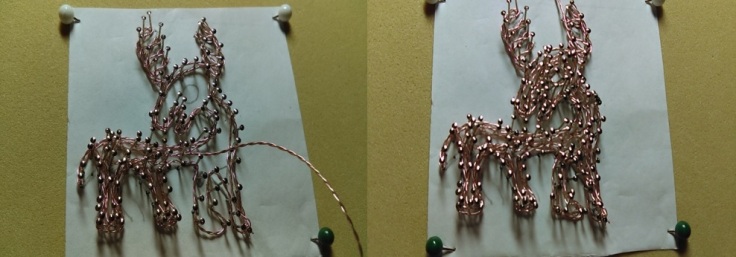
(left) Inside of deer in process (right) Completely shaped deer
As I unpinned the deer I became concerned that I would lose the shape. The pins would occasionally pull a piece of the wire straight and I would reform it as I went. When all of the pins were removed I was left with a solid outline with a mess of springy twisted wire inside. The wire, however springy and messy looking, had actually kept it’s desired shape.
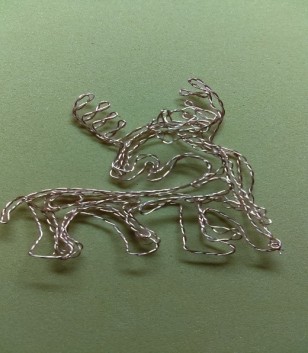
Deer unpinned and ready to be attached to fabric
It was now time to secure my wire to fabric. The extant piece was also mounted on fabric although I am not able to determine if it is wool or silk. Silk was used often to adorn garments and so I decided to use silk for this project. I stitched the wire onto the silk in a similar way to how I had pinned it onto the block. I first stitched down the outside and then carefully laid down the inner wire as well. This was difficult as the thread would get caught on the wire as I was stitching. Once the basic shape was stitched down I further adjusted my wire using the thread to manipulate the wire into its final shape.

(left) Posament in the process of being stitched down (right) Completed Golden Deer
I decided to accent the deer with a piece of coiled posament that I had previously created. I stitched the coiled piece underneath the deer in order to give my new piece finished look that resembled the extant piece.

“Golden Deer” from Grave BJ82 (top); Final Piece with Addition of Coiled Posament (bottom)
Conclusion
I am very happy with the process that I created and the things that I have learned throughout this process. After I was done with my pieces I was able to get the posament chapter of Birka III translated. The only thing that it mentions about the creation process is that it was most likely done on some sort of rod or needle. I was so excited to discover that I was able to come to the same conclusion independently of the book!
In the future I would like to work on making my own rod to use during tinthread creation so that the thread is held more securely and there is less chance of losing it during the process. It would be interesting to try to work with smaller sized rods if possible as well.
I would like to do further work with the twisted wire form as well. I’d like to work on adding additional adornments such as mica underneath the blank spaces on the body and in the eye. I also believe that the twisted wire piece need to be a more solid piece independent of the silk.
I definitely plan to communicate further with the museum to see if I can get more information about the size of the tentrad and wire used in the extant pieces and possibly more picture with size reference.
References
Birka III; Agnes Geijer, 1938
Historiska Museet; Personal communication and website, www.historiska.se
Linda Wåhlander; Personal communication
Posament: Pretty Knots from Birka; Annika Madejska, www.textiletimetravels.org
Silberknoten; Marieke Neumann, www.silberknoten.de
The Birka Chamber-Graves – Economic and Social Aspects: A Quantitative Analysis; Nils Ringstedt; Current Swedish Archaeology, Vol. 5, 1997
Viking Posament; www.tabbygram.blogspot.com/2013/11/viking-posament.html

Wow! This is high quality work. Very inspiring.
LikeLike
Thank you!
LikeLike
I do not even have words for this, simply amazing. Thank you for sharing
LikeLike
Thank you so much! I’m so excited about what I’ve learned and I’be been looking forward to sharing it.
LikeLike
This makes me so happy! I’ve been researching and trying to make posaments myself for a few years now and it’s exciting to see how we’ve had similar ideas. Here’s stuff from my first attempts http://tabbygram.blogspot.com/2013/11/viking-posament.html?m=1 I’ve done some since with silver craft cord that turned out better but I’d love to try some spiral wire like what you’ve made. Thank you so much for sharing so much, it’s so fun finding someone else who is doing this!
LikeLike
LOL, just found out you used me for a reference. I’m so touched and very happy it helped you. Now I really want to do an updated blog entry with my newer stuff. I’m very impressed with your work, you’ve done amazing!
LikeLiked by 1 person
I’m excited to see the new things you’re doing!
LikeLike
Nice work!
The original golden deer is “stitched” directly on the fabric, I think you don’t need to pin it down if you work it that way. This is why Geyer refers to it as embroidery in Birka III, not as a passament.
I found that the best method for creating spiral silver wire is to wind it directly on a silk thread. My setup is similar to yours, but I use an electric drill. You have to take a long thread and ensure it can turn itself on the other end. A short thread makes it harder to work because of the spin you add to it. Silk is the only material that can handle the stress, linen and wool break too easy.
The sizes of the original pieces can be found in Birka III. Most of the pictures at the end of the book are sized 1:1, all the others have a scale given in the text. The descriptions in the book also have the dimensions for many of the pieces.
LikeLiked by 1 person
Thank you for such an excellent article & for your beautifully executed work,.
LikeLike
Thank you very much 🙂
LikeLike
Thank you so much for sharing your experience and your knowledge about your art!
Last year I have started to work with spiral wire bought in Sweden and also have been trying to make some on my own. I´m so curious, when you start at the end of the rod, how do you manage to fix the wire to it so that the wire can be wound upon it? Since I can´t see a fixation in your pics I´m wondering why the rod doesn´t spin around inside the coil when you proceed.
And of course I would like to see some finished garments with the posaments 😀
LikeLike
Thank you very much! I’ll post another blog soon with a picture of finished pieces! I use a small piece of adhesive “glue dot” to get it to stay though I have a fair amount of spinning to contend with.
LikeLike
Thank you for your fast reply! As I know my talent I am sure when I use some glue I will never be able to separate it again 😉 Maybe I´ll have another try to produce some with my spinning wheel or drop spindle. Since Saami embroidery is one of the things I would love to do I found this article quite interesting: http://www.allfiberarts.com/2015/saami-tin-thread-spinning.htm
Also looking forward to your finished pieces!
LikeLike
Thank you 🙂 that’s actually one of my current projects
LikeLike